The Complete Guide to OpenID Connect (OIDC) & express-openid-connect
Authentication and authorization are sometimes misunderstood concepts.
I’ve seen developers confuse authentication with authorization, misuse OpenID Connect (OIDC), and implement identity flows without fully understanding what’s happening under the hood.
Because of that, I decided to create this guide hoping that it will help you undeststand the fundamentals of how OIDC works, and how to implement this flow it using express-openid-connect. I’m not just going to use the library, I will explain what’s happening under the hood as well.
Authentication vs Authorization
These therms are often mixed up by busoness people and engineers, but the difference is simple.
Here’s a real life scneario that can help understand of what the difference is:
When you travel internationally, someone needs to check your passport. The passport prooves your identiy, this answers the question: who are you? That’s authentication.
Then, before you board the plane, you show your boarding pass, the boarding pass proves that you are allowed to be on that flight, this anwsers the question: what are you allowed to do? That’s authorization.
Authentication establishes identity.
Authorization determines permissions.
What is an identity priovider ?
An identity provider (IdP) is a system responsible for authenticating users and providing proof of their identity to applications.
In the OpenID Connect specification(opens in a new tab), the term identity provider is not used. Instead, authorization server is used. Despite this, identity irovider is a widely used term in practice.
How does it actually work in practice?
Let’s take YouTube as an example. Back in the day we used to sign in via username and password, but today all we need to do is “sign in with Google”.
What happens here is, we are redirected to Google where we prove our identity and after signing in with Google, Google will send YouTube a verified identity, where YouTube than grants us access.
In short:
- Google acts as the authorization server
- YouTube acts as the client application
OpenID Connect does not define how Google authenticates us (passwords, MFA, etc.). It only defines how Google and YouTube securely exchange authentication information. There are a couple of auth flows that are available. I will expand apon this a bit later on.
What is OIDC?
OIDC is an authentication protocol built on top of OAuth 2.0. It allows an application to verify who a user is, based on authentication performed by a trusted identity provider.
At this point, you might wonder why OAuth 2.0 is even part of the picture? To understand that, it helps to look at how authentication on the web evolved.
Before cloud-based applications became the norm, authentication was often handled using passwords and tightly controlled, on-premise systems. As we slowly moved to the cloud, new approaches emerged.
Before OIDC, authentication evolved in stages:
- Kerberos - worked well inside closed, enterprise environments, but it was not designed for the open web.
- SAML - brought federated authentication to the web and solved many real problems, but it’s XML-based and complex for integrating in to SPAs and mobile apps.
- OAuth 2.0 - became the standard for authorization, but was often misused as an authentication mechanism.
- OpenID Connect - exists because none of solutions above cleanly solved modern authentication.
OIDC builds on top of OAuth 2.0 but adds a standardized way for applications to verify a user’s identity.
An OIDC flow contains of several steps:
-
A protected application redirects the user to the IdP for authentication.
-
The user logs in at the IdP.
-
The IdP redirects the user back to the application.
-
The application receives tokens as part of the response (what is recieved depends on the OIDC flow used)
-
After a successful authentication:
-
The application receives an ID Token
-
It may also receive an Access Token (if requested)
-
The ID Token contains verified information about the authenticated user and allows the application to confirm their identity.
The Access Token, on the other hand, is used to call protected APIs on the user’s behalf.
Now that we understand a little bit about OIDC flow, we’re ready to look at how the OIDC flow works in practice.
For simplicity, I will be relying on a library. Remember, the library abstructs a lot, but i will do my best, to explain the process under the hood eaiter way. Oh, and I’ll throw in a couple of diagrams too.
OIDC in Action!
First thing you’ll need, is an IdP that supports OIDC protocol. You can use Auth0, which has a pretty generous free tier or roll your own self-hosted solution with Keyklaok, or you can use other providers ofc.
I’ll be using Auth0.
I will be using node.js and express with express-openid-connect library.
Let’s install express and express-openid-connect:
npm install express express-openid-connect
minmimal example:
const express = require("express");
const { auth } = require("express-openid-connect");

const app = express();

const config = {
  authRequired: false,
  auth0Logout: true,
  secret: process.env.SESSION_SECRET,
  baseURL: "http://localhost:3000",
  clientID: process.env.CLIENT_ID,
  issuerBaseURL: process.env.ISSUER_BASE_URL,
  // authorizationParams:... see explanation below
};

app.use(auth(config));

app.get("/", (req, res) => {
  res.send(
    req.oidc.isAuthenticated()
      ? "You are logged in"
      : "You are logged out"
  );
});

app.listen(3000, () => {
  console.log("Server running at http://localhost:3000");
});
Let’s have a look at what excatly is happening in this piece of code.
app.use(auth(config));
express-openid-connect will build and register 3 routes, /login, /logout, /callback, next it will attach OIDC helpers to req and res so that you can use
req.oidc and res.oidc
Before we take a look at what these routs do, tehre’s one more thing I want to talk about, and that is the authorizationParams. These params are very important.
First, it’s good to know, that the dafut values with express-openid-connect are:
authorizationParams: {
  response_type: 'id_token',
  response_mode: 'form_post',
  scope: 'openid profile email'
}
response_type
response_type Determines the authorization processing flow to be used.
It can be Authorization Code, Implicit, or Hybrid. The flow determines how the ID Token and Access Token are returned to the Client.
| response_type value | Flow |
|---|---|
| code | Authorization Code Flow |
| id_token | Implicit Flow |
| id_token token | Implicit Flow |
| code id_token | Hybrid Flow |
| code token | Hybrid Flow |
| code id_token token | Hybrid Flow |
The most common and most secure flow is the Authorization Code Flow, and that’s the flow I will use in my explanation. However, feel free to explore the other flows defined in the specification.
response_mode
The response_mode parameter controls how the authorization server returns the response parameters (such as the authorization code or tokens) to the client. The supported values are query, fragment, and form_post. Based on the selected value, the authorization response will be delivered in a different way.
For example:
queryreturns the response parameters in the URL query stringfragmentreturns the response parameters in the URL fragmentform_postreturns the response parameters via an HTTP POST request
However for security reasons, express-openid-connect enforces the use of form_post. This is because returning tokens in URLs via query strings or url fragments can expose them through browser history, logs, or referrer headers. Using form_post avoids placing sensitive tokens in the URL and delivers them with a POST request instead.
scope
Lastly, scope is required. It identifies the protocol being used and specifies what user data the client is requesting.
Example:
scope=openid profile email
OpenID Connect requests MUST contain the
openidscope value.
| Scope | Required | Description |
|---|---|---|
openid | Required for IODC | Indicates that the request is an OpenID Connect authentication request. Without this scope, the request is treated as plain OAuth 2.0. |
profile | Optional | Requests access to the End-User’s basic profile information. |
email | Optional | Requests access to the End-User’s email information. |
address | Optional | Requests access to the End-User’s address information. |
phone | Optional | Requests access to the End-User’s phone information. |
offline_access | Optional | Requests a Refresh Token for long lived access, even when the user is not present. |
Not all scopes are defined by OpenID Connect. While scopes like
openidandprofileare part of the OIDC specification, scopes such asread:productsare application defined and are used for API authorization.
Authorization Code Flow (response_type=code)
The most common and recommended authorization flow in OIDC is the Authorization Code Flow.
It is depicted in the diagram below:
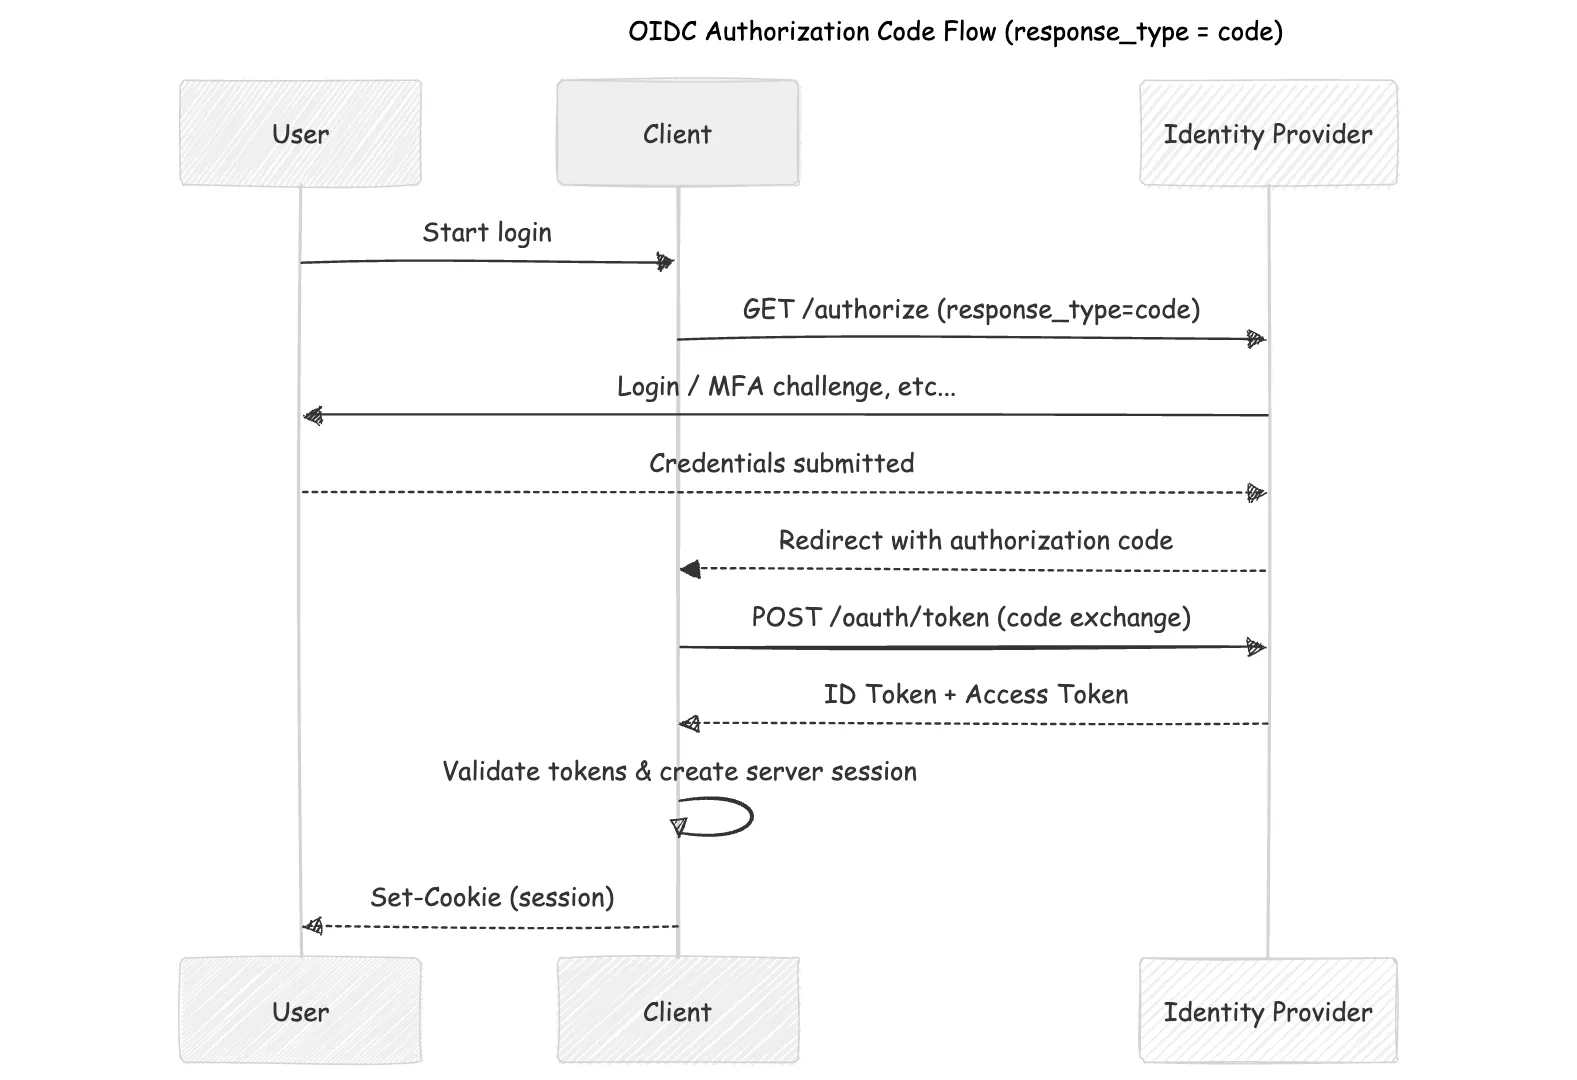
This flow is recommended because it exchanges tokens server-side (keeping them out of the browser), works across SPAs, mobile, and web apps, supports refresh tokens for long-lived sessions, and within express-openid-connect uses PKCE to prevent authorization code injection attacks.
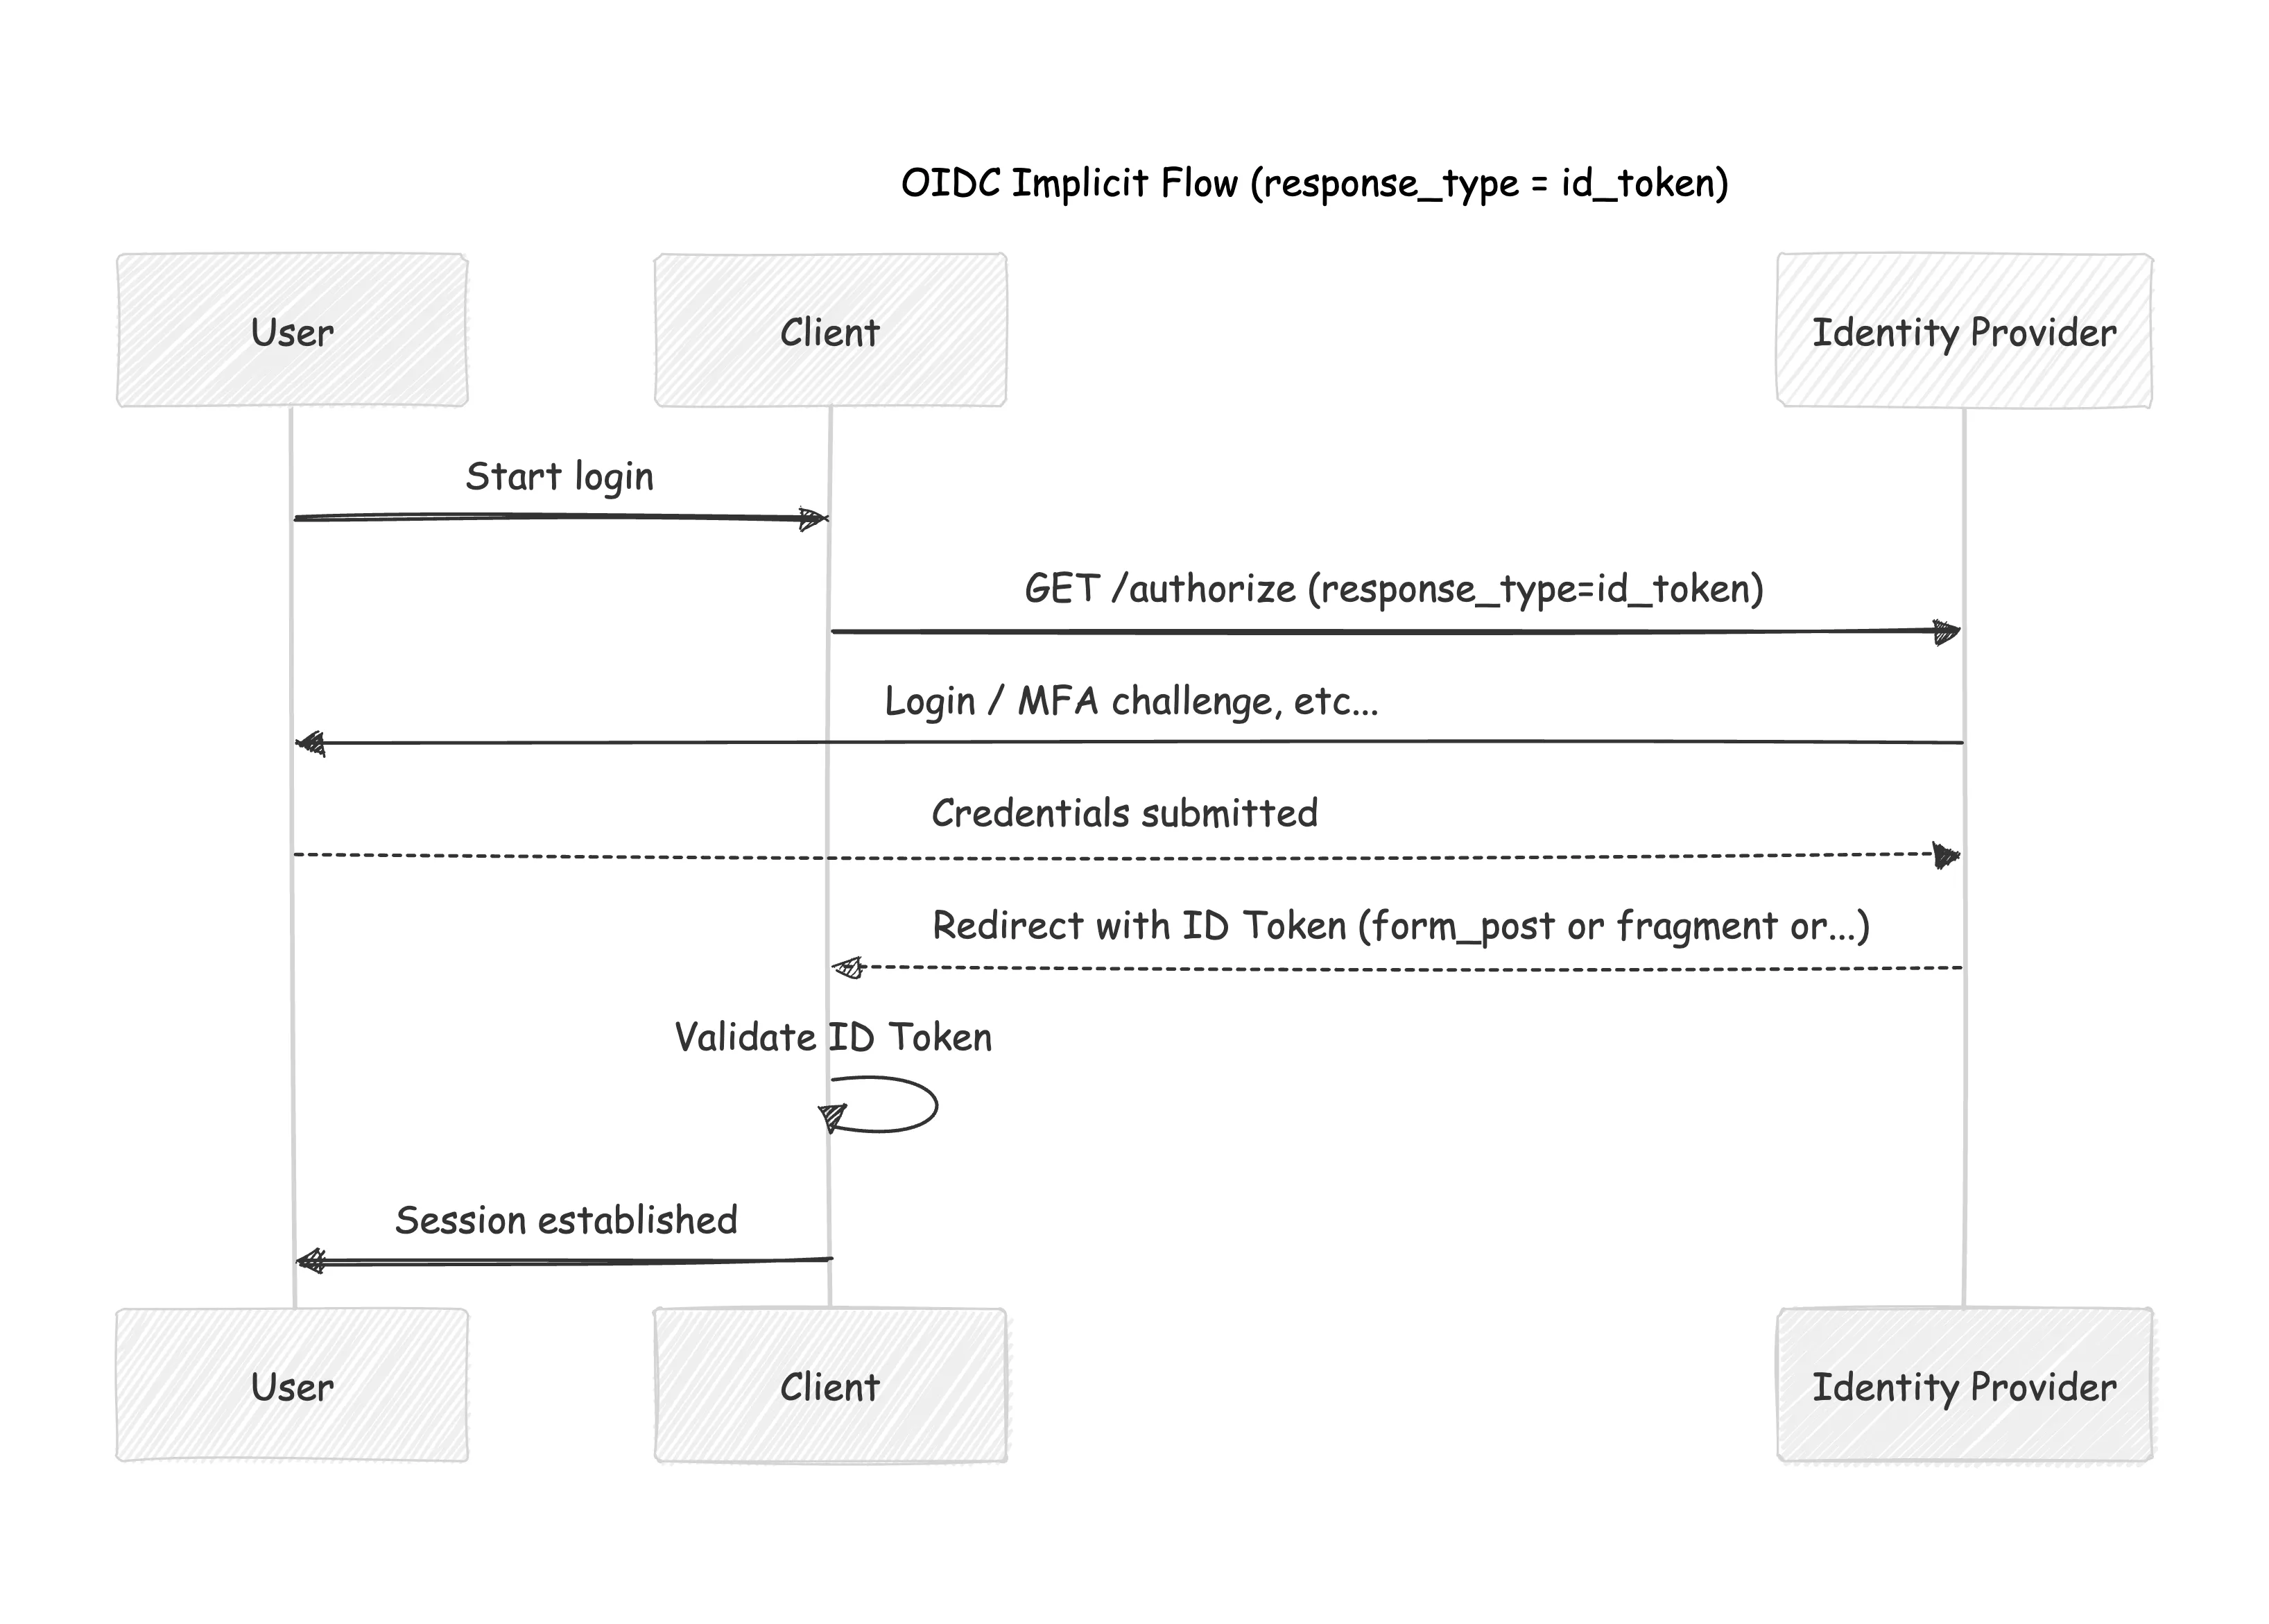
Implicit Flow (response_type=id_token)
OpenID Connect also allows a simpler flow. A less secure flow is response_type=id_token, when the identity provider returns an ID Token directly from the /authorize endpoint.
Hybrid Flow
Used in more advanced scenarios where both the front-end and back-end need tokens immediately, but it is far less common.
Default routes for express-openid-connect with response_type:code
Now that we have a solid understanding of the most common flows, we can move on and explore the default routes from the library
/login
router.get('/login', (req, res) =>
  res.oidc.login({ returnTo: config.baseURL })
);
When a user hits /login on our server, this is what happens:
HTTP/1.1 302 Found
X-Powered-By: Express
Set-Cookie: auth_verification=%7B%22nonce%22%3A%22_vs7UVM2nsvfmRdGu9b0P4FS6k6Go_KQJNJIVxi_ZVo%22%2C%22state%22%3A%22eyJyZXR1cm5UbyI6Imh0dHA6Ly9sb2NhbGhvc3Q6MzAwMCJ9%22%2C%22code_verifier%22%3A%22hhigt00AUO3Kltrq31mOZ9frSBG9aByUaoWNA32Uk1A%22%7D.OwEKEsUg5EcNCwT3Z89kPrSL_puXBgX6wzdmeD7QxV8; Path=/; HttpOnly; Secure; SameSite=None
Set-Cookie: _auth_verification=%7B%22nonce%22%3A%22_vs7UVM2nsvfmRdGu9b0P4FS6k6Go_KQJNJIVxi_ZVo%22%2C%22state%22%3A%22eyJyZXR1cm5UbyI6Imh0dHA6Ly9sb2NhbGhvc3Q6MzAwMCJ9%22%2C%22code_verifier%22%3A%22hhigt00AUO3Kltrq31mOZ9frSBG9aByUaoWNA32Uk1A%22%7D.LkRDPjk5BbzR5v5R2QRdG3GL57ZHWvGtwmc0Q0wbqtw; Path=/; HttpOnly
Location: https://dev-hhs6koda218fytu1.us.auth0.com/authorize?client_id=KhSdKzo4ddRqjIAQS5JexDYwzkQGLwex&scope=openid&response_type=code&redirect_uri=http%3A%2F%2Flocalhost%3A3000%2Fcallback&response_mode=form_post&nonce=_vs7UVM2nsvfmRdGu9b0P4FS6k6Go_KQJNJIVxi_ZVo&state=eyJyZXR1cm5UbyI6Imh0dHA6Ly9sb2NhbGhvc3Q6MzAwMCJ9&code_challenge_method=S256&code_challenge=GywntLuE8_pgPjSHKMcXJhgAwQeBEP-SuuL87dkZOPQ
Vary: Accept
Content-Type: text/html; charset=utf-8
Content-Length: 456
Date: Fri, 13 Feb 2026 20:12:30 GMT
Connection: keep-alive
Keep-Alive: timeout=5
- A transient verification cookie is set, containing
nonce,state, andcode_verifier, which are later validated during the callback before a session is created. - A reidrect to the identity Provider on the
authorization_endpointwhich in our case is/authorize
Now, you are probably wondering how did we end up with the /authorize endpoint.
We get to that endpoint besed on the identity Provider settings, for Auth0 found here: https://<issuer>/.well-known/openid-configuration.
Bellow is an example (i turncated it to make it shorter, but you get the idea. All available options are listed here):
{
  "issuer": "https://dev-hhs6koda218fytu1.us.auth0.com/",
  "authorization_endpoint": "https://dev-hhs6koda218fytu1.us.auth0.com/authorize",
  "token_endpoint": "https://dev-hhs6koda218fytu1.us.auth0.com/oauth/token",
  "device_authorization_endpoint": "https://dev-hhs6koda218fytu1.us.auth0.com/oauth/device/code",
  "userinfo_endpoint": "https://dev-hhs6koda218fytu1.us.auth0.com/userinfo",
  "mfa_challenge_endpoint": "https://dev-hhs6koda218fytu1.us.auth0.com/mfa/challenge",
  "jwks_uri": "https://dev-hhs6koda218fytu1.us.auth0.com/.well-known/jwks.json",
  "registration_endpoint": "https://dev-hhs6koda218fytu1.us.auth0.com/oidc/register",
  "revocation_endpoint": "https://dev-hhs6koda218fytu1.us.auth0.com/oauth/revoke",
  "scopes_supported": [
    "openid",
    "profile",
    "offline_access",
    "name",
    "given_name",
    "family_name",
    "nickname",
    "email",
    "email_verified",
    "picture",
    "created_at",
    "identities",
    "phone",
    "address"
  ],
  "response_types_supported": [
    "code",
    "token",
    "id_token",
    "code token",
    "code id_token",
    "token id_token",
    "code token id_token"
  ],
.....
}
So, when you initialize this library, that’s when a call is made to this endpoint https://<issuer>/.well-known/openid-configuration. This is when values from the config are used, such as:
"authorization_endpoint": "https://dev-hhs6koda218fytu1.us.auth0.com/authorize"
Once the user lands on the authorize endpoint, this is where they can enter their login credentials and complete any additional authentication steps, such as MFA, if enabled.
Since we initiated the request with response_mode=form_post, as we explained previously, it’s important to note that the authorization response will be sent to /callback via POST.
The /callback route
After the user authenticates with the IdP, the IdP redirects the browser back to your application’s /callback URL with an authorization code.
Example redirect:
GET /callback?code=SplxlOBeZQQYbYS6WxSbIA&state=xyz123
This callback URL must be registered with the IdP (for example, Auth0).
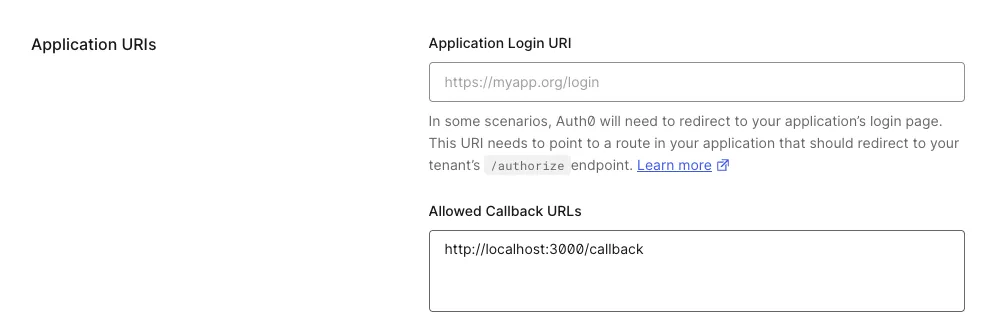 If it isn’t, the redirect is rejected with a “Callback URL mismatch” error. This restriction prevents authorization codes from being sent to untrusted destinations.
During the /callback redirect, the authorization code is sent to the backend, where it can be safely exchanged for tokens such as an access_token (if requested ofc) and an id_token using the client secret. Next, the library validates the ID token and creates an application session. Details are usually stored in a cookie called appSession (by default, you can ofc change this).
All of this is abstracted away for us as users of the library and handled under the hood.
The /logout route
The /logout route clears the user’s local application session and then redirects them to the IdP’s logout endpoint. This ensures the user is logged out both from your app and from the identity provider. The outcome can vary based on the config (example: idpLogout:true/false, default is false).
With express-openid-connect, this typically means:
- Destroying the server-side session
- Clearing the session cookie
- Redirecting the browser to the IdP’s logout endpoint
- Optionally redirecting back to a post-logout URL in your app
What about logging out everywhere?
Local logout alone isn’t always enough. If a user is logged into multiple applications using the same IdP session, those apps may still consider the user authenticated.
To address this, providers like Auth0 support Back-Channel Logout.
Back-channel logout is essentially a webhook mechanism:
- The IdP sends a server-to-server logout notification
- Your application receives it and invalidates matching sessions on subsequent requests.
With express-openid-connect, you can enable and handle back-channel logout directly.
Here’s a couple of examples in the official repository.
Before i wrap up, I would like to end this with a note that you have the option to override all the routes created by express-openid-connect.
If you need more control over the flow, you can disable the defaults and define your own.
See here:
app.use(
  auth({
    idpLogout: true,
    authRequired: false,
    routes: {
      // Pass custom options to the login method by overriding the default login route
      login: false,
      // Pass a custom path to the postLogoutRedirect to redirect users to a different
      // path after login, this should be registered on your authorization server.
      postLogoutRedirect: '/custom-logout',
      callback: false,
    },
  })
);
app.get('/', (req, res) => res.send('Welcome!'));

app.get('/login', (req, res) =>
  res.oidc.login({
    returnTo: '/profile',
    authorizationParams: {
      redirect_uri: 'http://localhost:3000/callback',
    },
  })
);

app.get('/custom-logout', (req, res) => res.send('Bye!'));

app.get('/callback', (req, res) =>
  res.oidc.callback({
    redirectUri: 'http://localhost:3000/callback',
  })
);

app.post('/callback', express.urlencoded({ extended: false }), (req, res) =>
  res.oidc.callback({
    redirectUri: 'http://localhost:3000/callback',
})
(Source:express-openid-connect Example Docs)
To wrap this up: while express-openid-connect abstracts away much of the complexity, it is still implementing the OIDC protocol under the hood.
I hope this explanation of the OIDC concepts and how express-openid-connect implements them has made the flow clearer and has given you a stronger mental model of what is happening at each.
Cya in the next one!